A little backstory here, I’ve been driving, reading about and wrenching on MX5s for over 4 years now. In that time there has been a few modifications that everyone has gone a little mad for. A craze, a fad so to say – the latest being ‘Delrin Door Bushings’ which I’m sure we will get into, in another installment.
There is a little controversy around frame rails, it’s not an easy one to quantify its benefits and it does involve drilling holes in your floor. Yet everyone who has done it says it makes a huge difference. I’m going to find out if that’s the case on an early, unbraced MK1 MX5 with Meister R suspension, original sills and zero rust – it’s a pretty good benchmark to answer the question.
What are ‘Frame Rails’?
The MX5 is a monocoque chassis, its a one piece design with the subframes bolted to the front and back. This means, like most convertibles it doesn’t have the inherent strength from the roof so it has a tendency to twist as the chassis absorbs some of the bumps / movement before the suspension does.
The big difference compared to a shopping trolly come convertible (see, Mk3 Golf Cabriolet), the ‘5 was designed to be a convertible from the ground up and it took inspiration from one of the greatest drivers cars of the 60s – the Lotus Elan.
So, even with the natural handicap of not having a roof, the ‘5 is still looked at as one of the best drivers cars due to its playful and predictable nature. I’m guessing you know where this is going.
When you get into these cars – or any others – and especially when you get into setting competitive times, you start to try and solve the inherent problems of your chosen vehicle, which brings us neatly on to the Frame Rails.
The MX5’s floor structure is given its strength by its sills, the firewalls (front and rear), the seat belt mounting points and the transmission tunnel. In part, the doors also soak up and stop some of the body’s flex when on the move, but really that’s not their job.
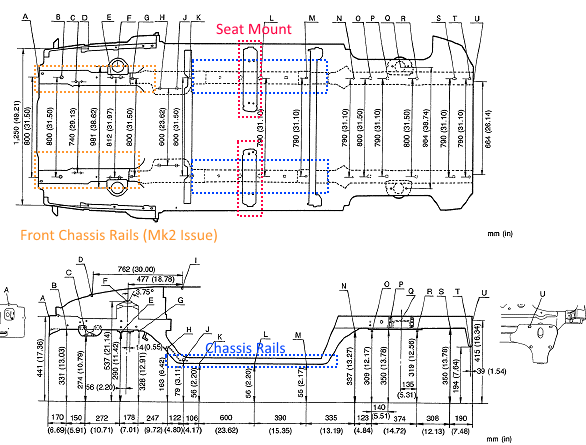
Additionally, there are 2 box sections that run the length of the car all the way from the very strong front subframe mounting area, (which has multiple skins and is a jacking point in itself) to the back of the car and actually up and over the rear tying into the rear subframe and diff mounting area.
Highlighted above are the Chassis Rails, and it gives you an idea of how they make up the structure of the car, note how difficult their job is and the size of the material used.
What these boxes do is try and tie everything together and they act to dampen the natural resonance of the tub as it oscillates and vibrates during normal operation, but as anyone who has been under a ‘5 knows – they are anything but strong between those jacking points.
There is certainly room for improvement.
The goal here is to solve 3 problems with the existing chassis rails.
- Protect them from tyre fitters crushing them with car lifts.
- Protect them from hitting speed bumps, damaging them and prematurely starting rust.
- Improve stiffness in this area allowing the suspension to soak up the Gs rather than the chassis.
The first 2 are really just as important as the last, MX5s are renowned for rusting and for my fresh import I want to try my hardest to keep them straight – considering I’m conservatively lowered and I already have underseal scraped off them, it’s been a good idea already.
We also need to define what we are expecting to happen here – I know this is not going to be a night and day difference. Whatever impact they have is going to be subtle, but will be felt across all uses. This isn’t going to net me a faster lap time on its own, but it will allow my other mods to do their job properly which in turn… might.
The Parts
The frame rails I have purchased are from a seller on MX5Nutz by the name of Samuel, aka Whisper. He is based in Slovakia and is currently the only supplier of a butterfly brace for reasonable money (we’ll come back to this in a few months time). (You can now buy direct from SkidNation)
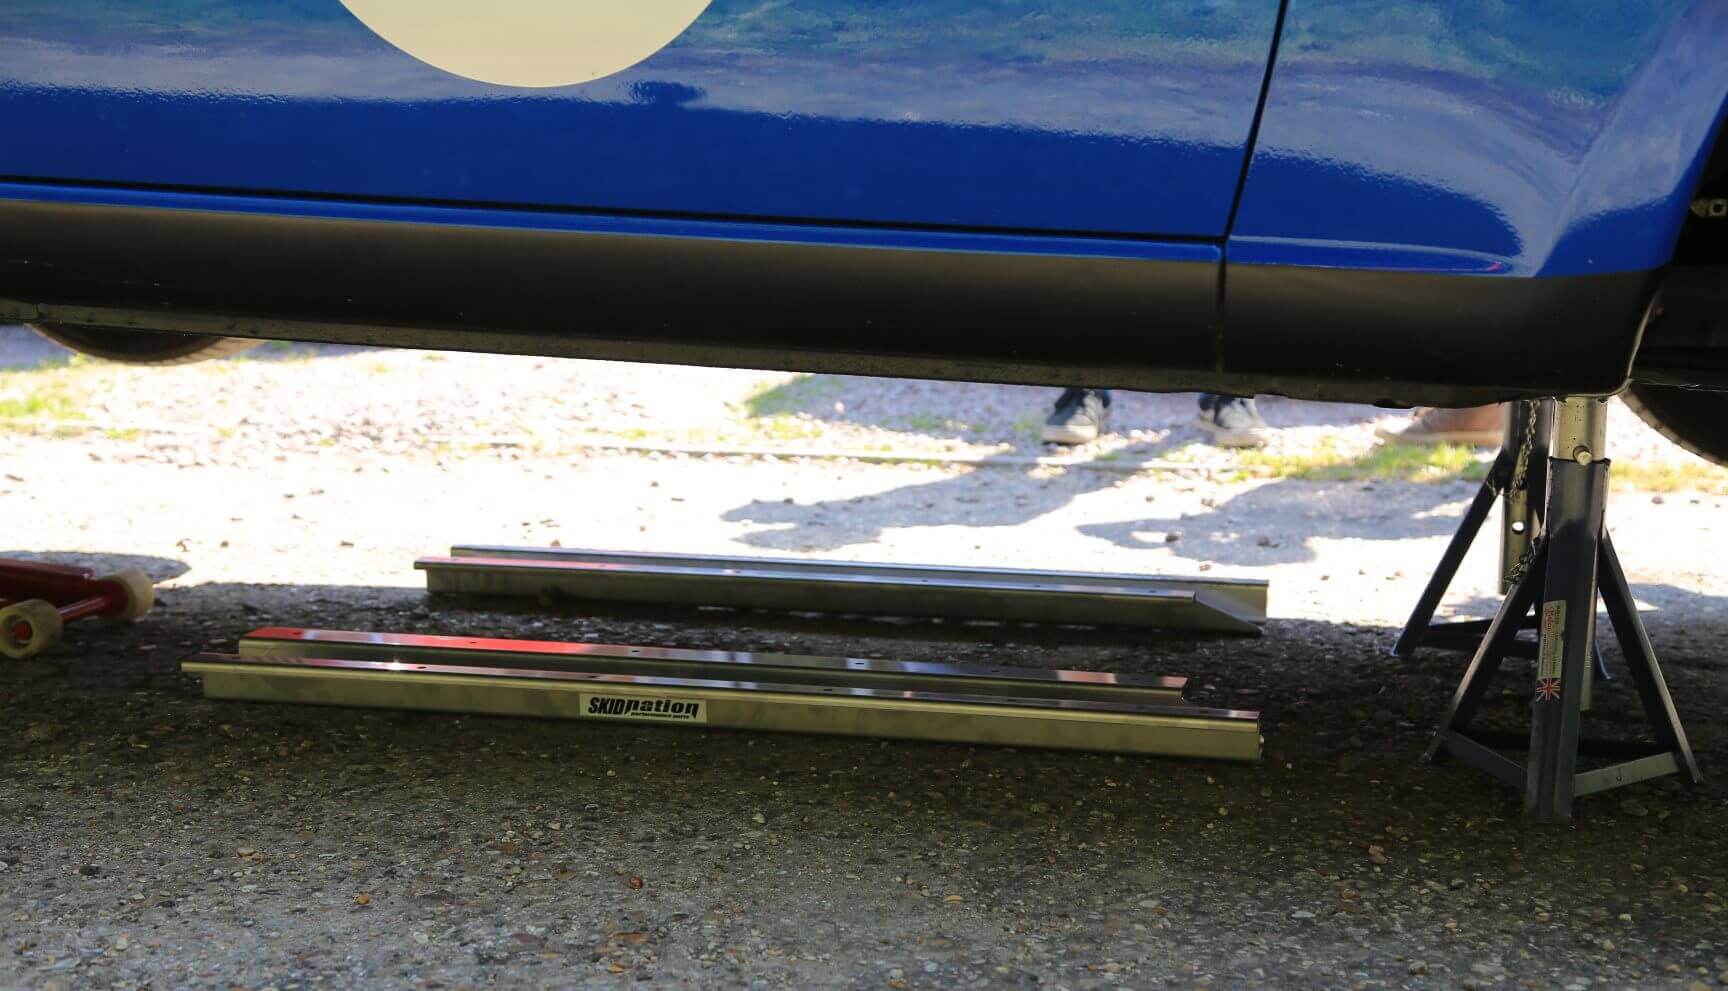
Seeing his progress and that he’s taken inspiration and learned from the others in the industry and considering the quality materials used I placed my order.
It took 3 days from purchase to arrival, coming just in time to install the kit on Saturday in 28c heat – excellent service and great communication.
Fitting the rails
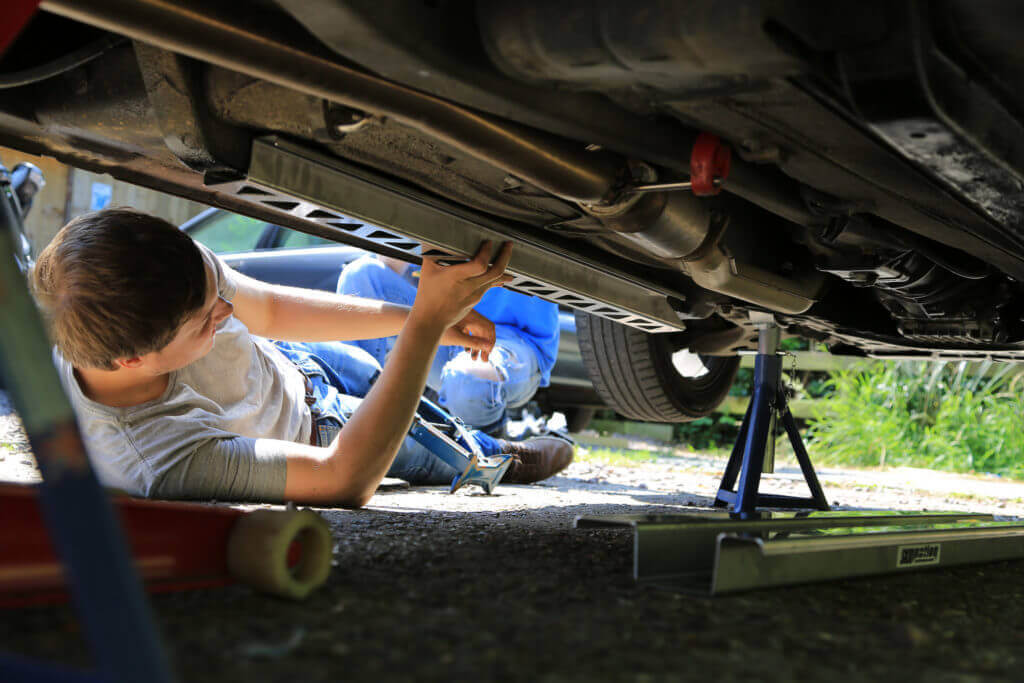
The fitment itself is fairly simple, but you should plan to be working on the car for most of the day and to take your time.
The first step is to get your car as high up as you safely can, remember guys and girls use jack stands! One on each corner.

If you have a low entry jack the best way to do this is to lift up the front via the middle of the subframe and get some stands on the bottom wishbone mounts on their lowest setting.
Then move to the back and jack up using the diff itself, jack placement is a little tricky at the back here, you can use the lower wishbone mount again or if you have a rubber insert you could use the sill itself.
With the car supported, you can lift it up higher as you need. I’d recommend enough to get your arm to the point where your elbow touches the floor but your hand doesn’t quite reach the floor of the car – granted, I’m a pretty short guy so this is easy for me – don’t go raising the car to the heavens.
With the car up a little higher, it’s easier to work on the interior of the car now. You’ll need to remove the seats, sill protectors, seatbelt mounts and the centre console – so you can get enough leverage on the carpet to move it out of the way of the floor.
With that safely secured, you can offer up the frame rails and start to get eye for how they fit, with these particular units they can only really fit one way, and it’s generally the case for all the aftermarket units as they have a wider mounting tab for the brake lines on the driver side.
You’ll want to use a jack to support the weight of the rails and offer them up, push them as far forward as the chassis allows. You’ll notice that at the front jacking point there is an angled edge which will effectively stop you going too far.
You’ll also notice that the fitment can be quite tight around the rails, that’s by design. You might have to massage the rails back into their correct shape and you should take the opportunity now to cover them liberally in your choice of paint or underseal – I went with Hammerite black for the areas where the underseal had been rubbed off.
Do this for both sides so you’re happy with the fitment and that everything is relatively even here. Then you can start drilling holes.
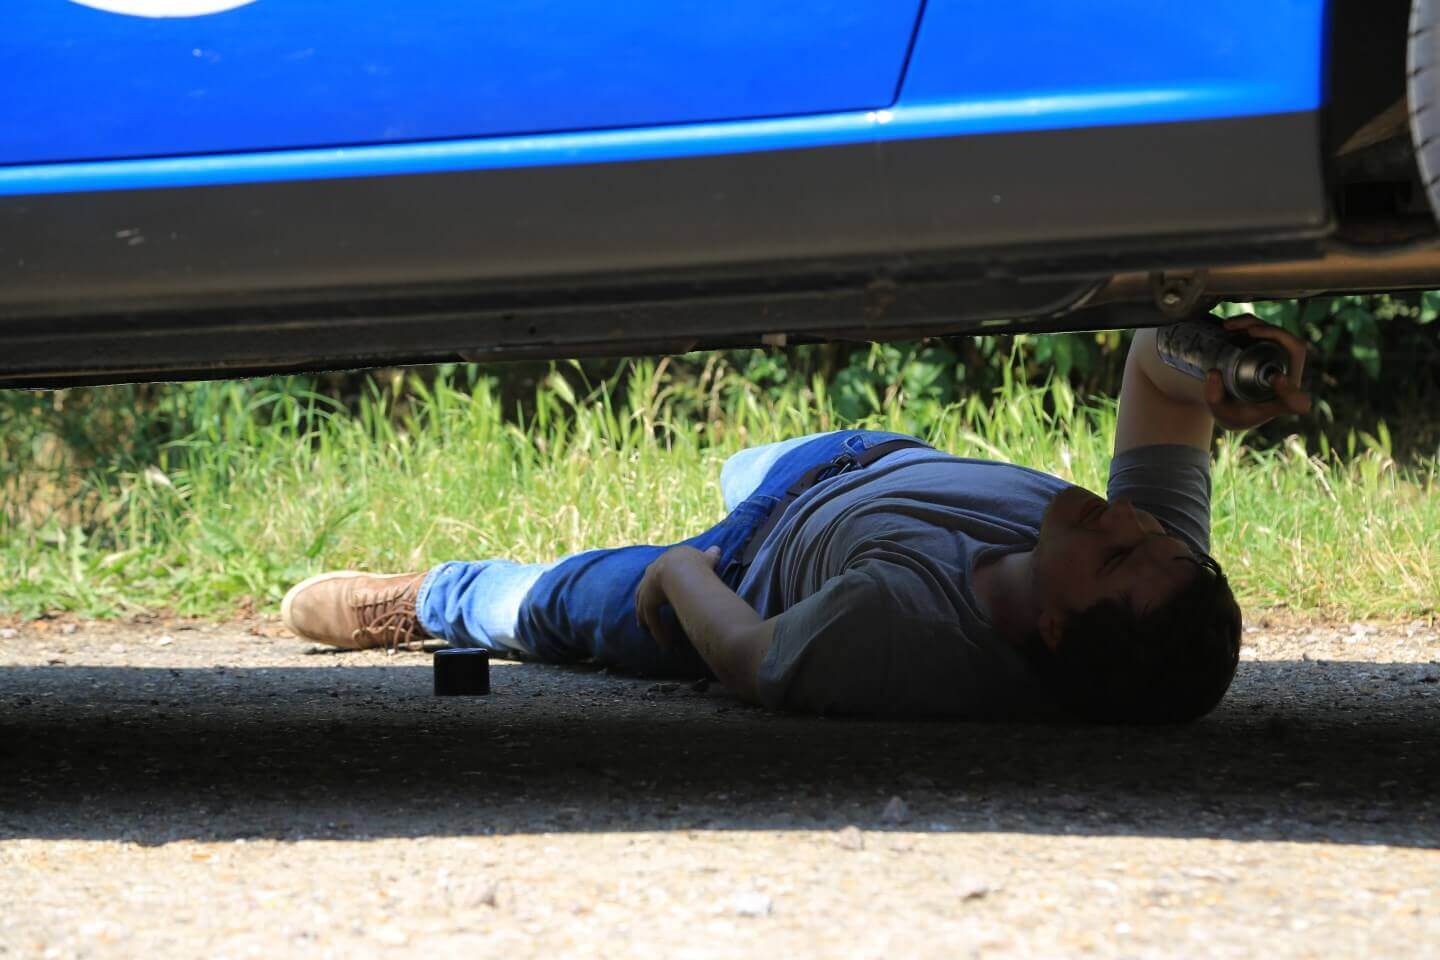
You’ll want to start with a 4mm HSS drill bit of a good quality and a decent drill, go through the floor and in places, you might find its double skinned or has a lip of sorts to contend with. Let the drill do the work here and try your best to get it straight – as that means less tidying up later.
Drill out 3 holes rear, middle, front, to 4mm then to 8.5mm and check the fitment with a couple of the bolts / nuts. If you’re happy, carry on and drill out all the holes to 4mm.
Remove the rails and then drill them out to 8.5mm.
Now is the time to make sure that everything is covered liberally in paint, spray the holes you’ve just drilled and ensure a good coat on the top and bottom as this area won’t be seen for a long time and we want to make sure we keep the tin worm at bay.
It’s recommended to apply RTV or silicone sealant around the bolt holes on the frame rails, this ensures you have a water tight seal between the new frame rails and floor pan when you bolt it down.
Bolt everything down and tighten everything up as much as you can, you will notice that the floor will deform and be pulled into the frame rails to create a stronger connection between the two.
The only difference with the drivers side is the brake lines – you’ll need to unclip them from their little plastic hold downs, install the hold downs into the new stainless clips provided (in this kit specifically) and re-install them.
You’ll need to take extra care to make sure you don’t damage the brake pipes when drilling this side, as you are drilling right between the 4 brake pipes.
That pretty much covers the install, budget a good 3 to 6 hours depending on how fast you work, how many helpers you have and how hot it is – I wouldn’t bother if it’s raining as it really helps to have the roof down to get the seats out etc.
First drive and initial thoughts
At this stage everything is done, the car just needs to be dropped back down which is now considerably easier as you can come in from the side using the frame rails anywhere you like now.
This in itself is a big help and I’m very much safe in the knowledge that speed bumps won’t be slowly ripping my rails to pieces.
So what about real world differences, can I actually tell?
This car has always been on Meister R suspension, it’s always had the damping at 17 hard front and 15 hard rear, no pre-load on the ARBs and the recommended ride height. It has the same tyres on it that I’ve done autosolo on and a lot of road driving.
When I say that I can tell a difference it’s something that I’m going to have a hard time quantifying, it’s something the guys on the blog have noticed too and like for me, its difficult to put into words exactly the benefits.
I can give anecdotal information like the car now feels more substantial, that is to say, it isn’t upset by lumps and bumps in the road quite so much – it feels like the suspension is doing its job rather than the chassis soaking up the movement.
If I had to put a % on it, It’d be somewhere in the region of 80% of the motion has been removed from the chassis – I thought pretty hard about that number, some people may disagree and it’s not like I can really prove it but to me, in my car with its limited factory bracing it feels much more planted over specific bumps.
Less quantifiable things are how the doors seem to shut with more of a thunk and how I haven’t heard a door rattle since installing, something which I was aware of but you just accept as part of the car.
And one very controversial thing, but something i believe i can explain – the car feels like it’s better able to put its power down to the ground. Now, i can already hear the moans in the background and the sarcastic “+10HP dude” but in all seriousness, the car has / had a tendency to (what i call) ‘banjo’ when on and off the power, not much, but just enough.
You could tell this pretty easily by how the diff reacted, it’s just the standard 1.6 VSLD which chatters and makes noise when it come on and off load. It’s quite obvious when it’s doing it, and it used to do it all the time when I would roll on and off the power.
This would in turn upset the car and the driver, just enough to be noticeable. As the car is running an MS3 and it’s in a constant state of tune, I’d blamed that – but now the ‘banjo’ing is all but gone.
It seems to hook up better off-corner and is more controllable if you want to change the angle of exit / entry, my guess is that the suspension geometry is able to stay more static.
Well, I’ve laid out some pretty bold claims here, to qualify them I’m not saying you can’t get similar results from factory bracing – hell, Mk2.5s feel a more substantial car in themselves due to the added weight and factory bracing – but they do have door rattles.
I’m interested to see what the butterfly brace will do to stop lateral and diagonal movement, most of the lateral will be taken up by the roll bar but largely only in the rear of the car due to its position. Whereas a butterfly brace is more central / forward in the car.
Well, I’ll call that review done – all opinions are my own and none of the items used were sponsored in any way.
In the next instalment, we’ll talk a little more about how the subframes mate up to the chassis, the load it has to deal with and the torsional forces we are looking to try and minimise. It’ll give us the opportunity to discuss the best ‘bang for buck’ bracing mods for an early MX5 and ones that aren’t worth your while to do.
If you have any questions please feel free to drop us a line on our contact us page, or check out our Facebook page.

One comment
That’s this months cash spent then.
Another good read